Getting Started with Zend_Auth
This tutorial is intended to show the basics of integrating Zend_Auth into an application using a login form. Zend_Auth is responsible for authentication which is the process of identifying an individual based on their credentials (usually a username and password).
It has been tested on version 1.10 of Zend Framework. It may not work on any version prior to version 1.10.
Zend_Auth is separated into a core component and a set of adapters. The adapters contain the actual code for authorising a user again a given system, such as HTTP, a database, LDAP etc. Once successfully logged in, the Zend_Auth core object allows access to the identity which is a set of fields that contain the information gained at login, such as username. The exact fields within the identity depend upon the adapter that was used. For instance, the HTTP adapter will return the username and realm whereas the database table adapter has access to the entire the entire table row.
In this tutorial, we will look at what needs to be done to log in using authentication against a database table.
The users table
The first thing we need is a database table, called users. It doesn’t need to be complicated, so the schema looks like this (in MySQL):
CREATE TABLE IF NOT EXISTS users (
  id int(11) NOT NULL AUTO_INCREMENT,
  username varchar(50) NOT NULL,
  password varchar(50) NOT NULL,
  salt varchar(50) NOT NULL,
  role varchar(50) NOT NULL,
  date_created datetime NOT NULL,
  PRIMARY KEY (id)
)
We also need a user that can log in:
INSERT INTO users (username, password, salt, role, date_created)
VALUES ('admin', SHA1('passwordce8d96d579d389e783f95b3772785783ea1a9854'),
	'ce8d96d579d389e783f95b3772785783ea1a9854', 'administrator', NOW());
This user has a username of ‘admin’ and a password of ‘password’. In order to improve security, we are using a “salt” value with the password that the user uses to log in with. This results in an SHA1 key that is not reversible with http://www.sha1-lookup.com. The actual value of the salt doesn’t really matter, as long as it’s random. I’ve used the SHA1 value of a random number.
Run these statements in a MySQL client such as phpMyAdmin or the standard MySQL command-line client. (Arguably, you should pick a better username and password!)
Auth controller and login form
Obviously, we’ll need a Zend Framework project, so let’s start off with the zf command line tool:
zf create project zf-auth-tutorial
I will assume you know how to configure your web server to make a ZF project work. If not, look at my tutorial.
You also need to configure the database in application.ini:
resources.db.adapter = "Pdo_Mysql"

resources.db.params.charset = "utf8"

resources.db.params.host = "localhost"

resources.db.params.username = "rob"

resources.db.params.password = "123456"

resources.db.params.dbname = "zfauthtutorial"
(Obviously, you should use your own database credentials and set the database to the same one as where you created the users table earlier!)
We will implement our login and log out functionality within a separate controller, AuthController. Change directory to the zf-auth-tutorial root and use the zf command line tool to create the controller file and view script:
zf create controller Auth
This creates the AuthController class in application/controllers/AuthController.php including an indexAction and associated view script which we’ll use for the logging in process.
We’ll also need a log-in form, so back to the zf command line tool:
zf create form Login
This creates our Application_Form_Login form in application/forms/Login.php. We need to add three elements to it: username text field, password password field and a submit button:
class Application_Form_Login extends Zend_Form

{

    public function init()

    {

        $this->setName("login");

        $this->setMethod('post');
$this->addElement('text', 'username', array(
'filters' => array('StringTrim', 'StringToLower'),
'validators' => array(
array('StringLength', false, array(0, 50)),
),
'required' => true,
'label' => 'Username:',
));
$this->addElement('password', 'password', array(
'filters' => array('StringTrim'),
'validators' => array(
array('StringLength', false, array(0, 50)),
),
'required' => true,
'label' => 'Password:',
));
$this->addElement('submit', 'login', array(
'required' => false,
'ignore' => true,
'label' => 'Login',
));
}
}
We now need to load the form in the controller and render in the view script. The code required is not dissimilar from the form handling explained in my Zend Framework tutorial and looks like this:
application/controllers/AuthController.php
    // ...

    public function indexAction()

    {

        $form = new Application_Form_Login();

        $request = $this->getRequest();

        if ($request->isPost()) {

            if ($form->isValid($request->getPost())) {

                // do something here to log in

            }

        }

        $this->view->form = $form;

    }

    // ...
The associated view script is:
application/views/scripts/auth/index.phtml
< ?php $this->headTitle('Login'); ?>
Login
< ?php echo $this->form->setAction($this->url()); ?>
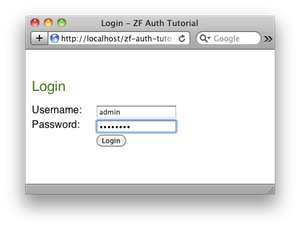
With a little bit of CSS, http://localhost/zf-auth-tutorial/public/auth gives us a login form like this:
Authenticating
In order to authenticate, we need to replace our comment of “// do something here to log in” with some real code! For simplicity’s sake, we’re going to put the code required into the AuthController, though in a bigger application, you may want to consider using a service layer object.
We’ll create a method called _process() to do the work so start by updating indexAction() in AuthController.php:
application/controllers/AuthController.php
    // ...

    public function indexAction()

    {

        $form = new Application_Form_Login();

        $request = $this->getRequest();

        if ($request->isPost()) {

            if ($form->isValid($request->getPost())) {

                if ($this->_process($form->getValues())) {

                    // We're authenticated! Redirect to the home page

                    $this->_helper->redirector('index', 'index');

                }

            }

        }

        $this->view->form = $form;

    }

    // ...
As you can see, we have added a call to our protected _process() method and then if it returns true, we redirect to the home page using the redirector action helper.
The _process() method looks like this:
application/controllers/AuthController.php
    // ...

    protected function _process($values)

    {

        // Get our authentication adapter and check credentials

        $adapter = $this->_getAuthAdapter();

        $adapter->setIdentity($values['username']);

        $adapter->setCredential($values['password']);
$auth = Zend_Auth::getInstance();
$result = $auth->authenticate($adapter);
if ($result->isValid()) {
$user = $adapter->getResultRowObject();
$auth->getStorage()->write($user);
return true;
}
return false;
}
// ...
This code uses another method _getAuthAdapter() to set up the Zend_Auth_Adapter_DbTable object that will be used to do the actual authentication. Once we have it, we use the setIdentity method to tell it the username that the user has entered and the setCredential method to tell it the password.
Having told the adapter all that it needs, we then grab the Zend_Auth object using $auth = Zend_Auth::getInstance(); which shows that Zend_Auth is a Singleton. Zend_Auth‘s authenticate method is used to test if the supplied username and password is correct.
If it is, then we retrieve the data (as a stdClass) from the users table for this user using getResultRowObject() and then store it to the auth adapter for use in all subsequent requests.
The code for _getAuthAdapter() is:
application/controllers/AuthController.php
    // ...

    protected function _getAuthAdapter() {
$dbAdapter = Zend_Db_Table::getDefaultAdapter();
$authAdapter = new Zend_Auth_Adapter_DbTable($dbAdapter);
$authAdapter->setTableName('users')
->setIdentityColumn('username')
->setCredentialColumn('password')
->setCredentialTreatment('SHA1(CONCAT(?,salt))');
return $authAdapter;
}
// ...
We instantiate a Zend_Auth_Adapter_DbTable, passing it the default database adapter from Zend_Db_Table which was helpfully configured for us by Zend_Application as a result of the application.ini settings. We can tell tell it to use the users table and that the identity column and credential columns are username and password respectively.
We use setCredentialTreatment to tell the adapter that the password is stored as an SHA1 and that the value in the salt field should be concatenated to the supplied password when authenticating. If you don’t want to use a salt or SHA1 hashing, then removing this line will allow you to use plain text passwords in your database.
The user can now log in by going to http://localhost/zf-auth-tutorial/auth and filling in the correct username and password.
Who is logged in?
Now that the user is logged in, it’s not uncommon to display the user’s name and provide a link to log out. We could do this as a view helper like this:
application/views/helpers/LoggedInAs.php
class Zend_View_Helper_LoggedInAs extends Zend_View_Helper_Abstract

{

    public function loggedInAs ()

    {

        $auth = Zend_Auth::getInstance();

        if ($auth->hasIdentity()) {

            $username = $auth->getIdentity()->username;

            $logoutUrl = $this->view->url(array('controller'=>'auth',

                'action'=>'logout'), null, true);

            return 'Welcome ' . $username .  '. Logout';

        }
$request = Zend_Controller_Front::getInstance()->getRequest();
$controller = $request->getControllerName();
$action = $request->getActionName();
if($controller == 'auth' && $action == 'index') {
return '';
}
$loginUrl = $this->view->url(array('controller'=>'auth', 'action'=>'index'));
return 'Login';
}
}
This code is fairly simple. The important thing is that we retrieve the Zend_Auth object and the test if a user is logged in using hasIdentity(). If the user is logged in, then we use getIdentity() to retrieve the data that we loaded earlier – in this case the username.
We can then use it in our layout.phtml like this:
Logout
In order to log out, we create another action, logoutAction in our AuthController:
zf create action logout Auth
This creates the logoutAction method in the AuthController class. The code is trivial:
application/controllers/AuthController.php
    // ...

    public function logoutAction()

    {

        Zend_Auth::getInstance()->clearIdentity();

        $this->_helper->redirector('index'); // back to login page

    }

    // ...
The clearIdentity method of Zend_Auth performs the logout and then we redirect wherever we want the user to go. In this case, I’ve chosen the login page.
That’s all you need to know to get started with Zend_Auth and add authentication to your application. To decide when your application needs the user to be logged in, I recommend using the Zend_Acl component.
Code
A working Zend Framework project of this tutorial is available:
Previous versions of this tutorial
Changelog
- 2.0 (26/Jul/2010)
- New version for Zend Framework 1.10


