Setting up ZF2's ZendTool side by side with ZF1
Note: this article does not refer to the released version of Zend Framework 2!.
If you want to play with the development versions of Zend Framework 2.0, then it’s handy to be able to create ZF2 projects using the ZendTool command line tool.
Rather unhelpfully, ZF2’s ZendTool uses the same ini file (~/.zf.ini) as ZF1’s Zend_Tool and the same zf.sh script filename, so you can’t just put zf2 on to your path and it’ll all just work.
I am assuming that you’re like me and have production sites using ZF1, so you probably don’t want to mess up your current zf.sh usage. This is how I implemented side-by-side ZF cli scripts.
1. Install ZF2 somewhere
I like to install in /usr/local/include. From the command line type:
cd /usr/local/include

git clone git://git.zendframework.com/zf.git zf2
Don’t forget to periodically update it with:
cd /usr/local/include

git pull origin master
(And don’t be surprised when it breaks whatever you’ve already coded in ZF2.dev!)
2. Create .zf2.ini
You need an ini file for ZF2, so call it .zf2.ini and store it in your home directory next to .zf.ini. You need to set the correct include path so that ZendTool’s zf.php can find your ZF2 installation. From the command line type:
echo 'php.include_path = "/usr/local/include/zf2/library:/usr/local/include/Akrabat/zf2/"' >> ~/.zf2.ini
This creates the .zf2.ini file with the correct include_path set up.
3. Create a zf2 alias
Update your ~/.bash_profile to set up an alias to the ZF2 zf.sh script.
Using a text edit, add this line to the end of ~/.bash_profile:
alias zf2='export ZF_CONFIG_FILE=~/.zf2.ini; /usr/local/include/zf2/bin/zf.sh'
Restart your terminal or type source ~/.bash_profile
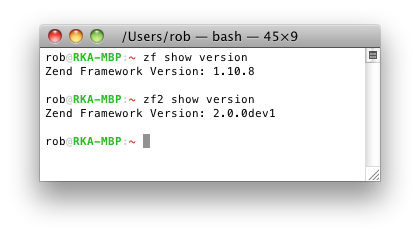
Now you can type zf2 to run ZF2’s zf.sh and ZendTool will run and not be affected by any ZF1 configurations you may have!


Hi Rob
Very useful post, thanks.
But why are different paths to ZF2 at the second and third step?
'/www/zend-framework/zf2/bin/' – this is a symlink to '/usr/local/include/zf2/'?
Hi Oleg,
I actually have two copies of ZF2 on my computer… I've updated the article to be consistent :)
Regards,
Rob…
I thought that there is no difference of content of these two paths, but decided to clarify.
Thanks for the explanation
Anyway I can checkout latest ZF2 on Windows using Subversion?
For Doctrine2 I can use:
svn co http://svn.github.com/doctrine/doctrine2.git doctrine2-orm
Tried:
svn co http://git.zendframework.com/zf.git zf2
But no cigar! Google also draws a blank.
Thx
Hi Rob,
I set this op in my home folder, but when I try to use the zf2 command, eg. zf2 create project zf2test i get the following error:
Fatal error: Cannot redeclare class ZendToolProjectProviderProject in /Users/johan/zf2/library/Zend/Tool/Project/Provider/Project.php on line 241
@johan I have the same problem. It's look like that ZendTool ain't ready for use yet
@johan @sasquatch
I had the same problem. But I downloaded today the last version by Git, and there is still a problem, but different :
When I now run "zf2 create project foo", I have a zf.sh error :
An Error Has Occurred
"projectDirectory" was supplied but no profile file file was not found
at location /.zfproject.xml
I would tend to agree with sasquatch that ZF2's ZendTool is a work in progress…
I've tried with zf.sh v1 to create the project, and just replaced the old classes with the new, with namespaces – Zend_Application with ZendApplicationApplication, Zend_Controller_Action with ZendControllerAction, Zend_Application_Bootstrap_Bootstrap with ZendApplicationBootstrap. It worked for me.