The beginner's guide to contributing to a GitHub project
This is a guide to contributing to an open source project that uses GitHub. It’s mostly based on how I’ve seen Zend Framework, Slim Framework and joind.in operate. However, this is a general guide so check your project’s README for specifics.
TL;DR
Skip to the summary.
Step 1: Set up a working copy on your computer
Firstly you need a local fork of the the project, so go ahead and press the “fork” button in GitHub. This will create a copy of the repository in your own GitHub account and you’ll see a note that it’s been forked underneath the project name:

Now you need a copy locally, so find the “SSH clone URL” in the right hand column and use that to clone locally using a terminal:
$ git clone git@github.com:akrabat/zend-validator.git
Which will do something like this:

Change into the new project’s directory:
$ cd zend-validator
Finally, in this stage, you need to set up a new remote that points to the original project so that you can grab any changes and bring them into your local copy. Firstly clock on the link to the original repository – it’s labeled “Forked from” at the top of the GitHub page. This takes you back to the projects main GitHub page, so you can find the “SSH clone URL” and use it to create the new remote, which we’ll call upstream.
$ git remote add upstream git@github.com:zendframework/zend-validator.git
You now have two remotes for this project on disk:
- origin which points to your GitHub fork of the project. You can read and write to this remote.
- upstream which points to the main project’s GitHub repository. You can only read from this remote.
Step 2: Get it working on your machine
Now that you have the source code, get it working on your computer. Hopefully there will be documentation how to do this in the README or INSTALL file.
If you get it working, but the documentation is unclear, then improving that bit should be your first PR to the project. This happens to me a lot and I’ve updated getting-started docs a lot as my first PR to a project!
Step 3: Do some work
This is the fun bit where you get to contribute to the project. It’s usually best to start by fixing a bug that is either annoying you or you’ve found on the project’s issue tracker. If you’re looking for a place to start, a lot of projects use the “easy pick” label (or some variation) to indicate that this issue can be addressed by someone new to the project.
Now that you have picks an issue, reproduce it on your version. Once you have reproduced it, read the code to work out where the problem is. Once you’ve found the code problem, you can move on to fixing it.
Branch!
The number one rule is to put each piece of work on its own branch. If the project is using git-flow, then it will have both a master and a develop branch. The general rule is that if you are bug fixing, then branch from master and if you are adding a new feature then branch from develop. If the project only has a master branch, the branch from that. Some projects, like Slim use branches named after the version number (2.x and 3.x in Slim’s case). In this case, pick the branch that’s relevant.
For this example, we’ll assume we’re fixing a bug in zend-validator, so we branch from master:
$ git checkout master
$ git pull upstream master && git push origin master
$ git checkout -b hotfix/readme-update
Firstly we ensure we’re on the master branch. Then the git pull command will sync our local copy with the upstream project and the git push syncs it to our forked GitHub project. Finally we create our new branch. You can name your branch whatever you like, but it helps for it to be meaningful. Including the issue number is usually helpful. If the project uses git-flow as zend-validator does, then there are specific naming conventions where the branch is prefixed with “hotfix/” or “feature/”.
Now you can do the work to fix the issue.
If the project has tests, run them to ensure you haven’t broken anything. You may also add a new test to show that your change fixes the original problem.
Ensure that you only fix the thing you’re working on. Do not be tempted to fix some other things that you see along the way, including formatting issues, as your PR will probably be rejected.
Make sure that you commit in logical blocks. Each commit message should be sane. Read Tim Pope’s A Note About Git Commit Messages.
Step 4: Create the PR
To create a PR you need to push your branch to the origin remote and then press some buttons on GitHub.
To push a new branch:
$ git push -u origin hotfix/readme-update
This will create the branch on your GitHub project. The -u flag links this branch with the remote one, so that in the future, you can simply type git push origin.
Swap back to the browser and navigate to your fork of the project (https://github.com/akrabat/zend-validator in my case) and you’ll see that your new branch is listed at the top with a handy “Compare & pull request” button:

Go ahead and press the button!
If you see a yellow box like this:

Click the link which will take you to the project’s CONTRIBUTING file and read it! It contains valuable information on how to work with the project’s code base and will help you get your contribution accepted.
On this page, ensure that the “base fork” points to the correct repository and branch. Then ensure that you provide a good, succinct title for your pull request and explain why you have created it in the description box. Add any relevant issue numbers if you have them.
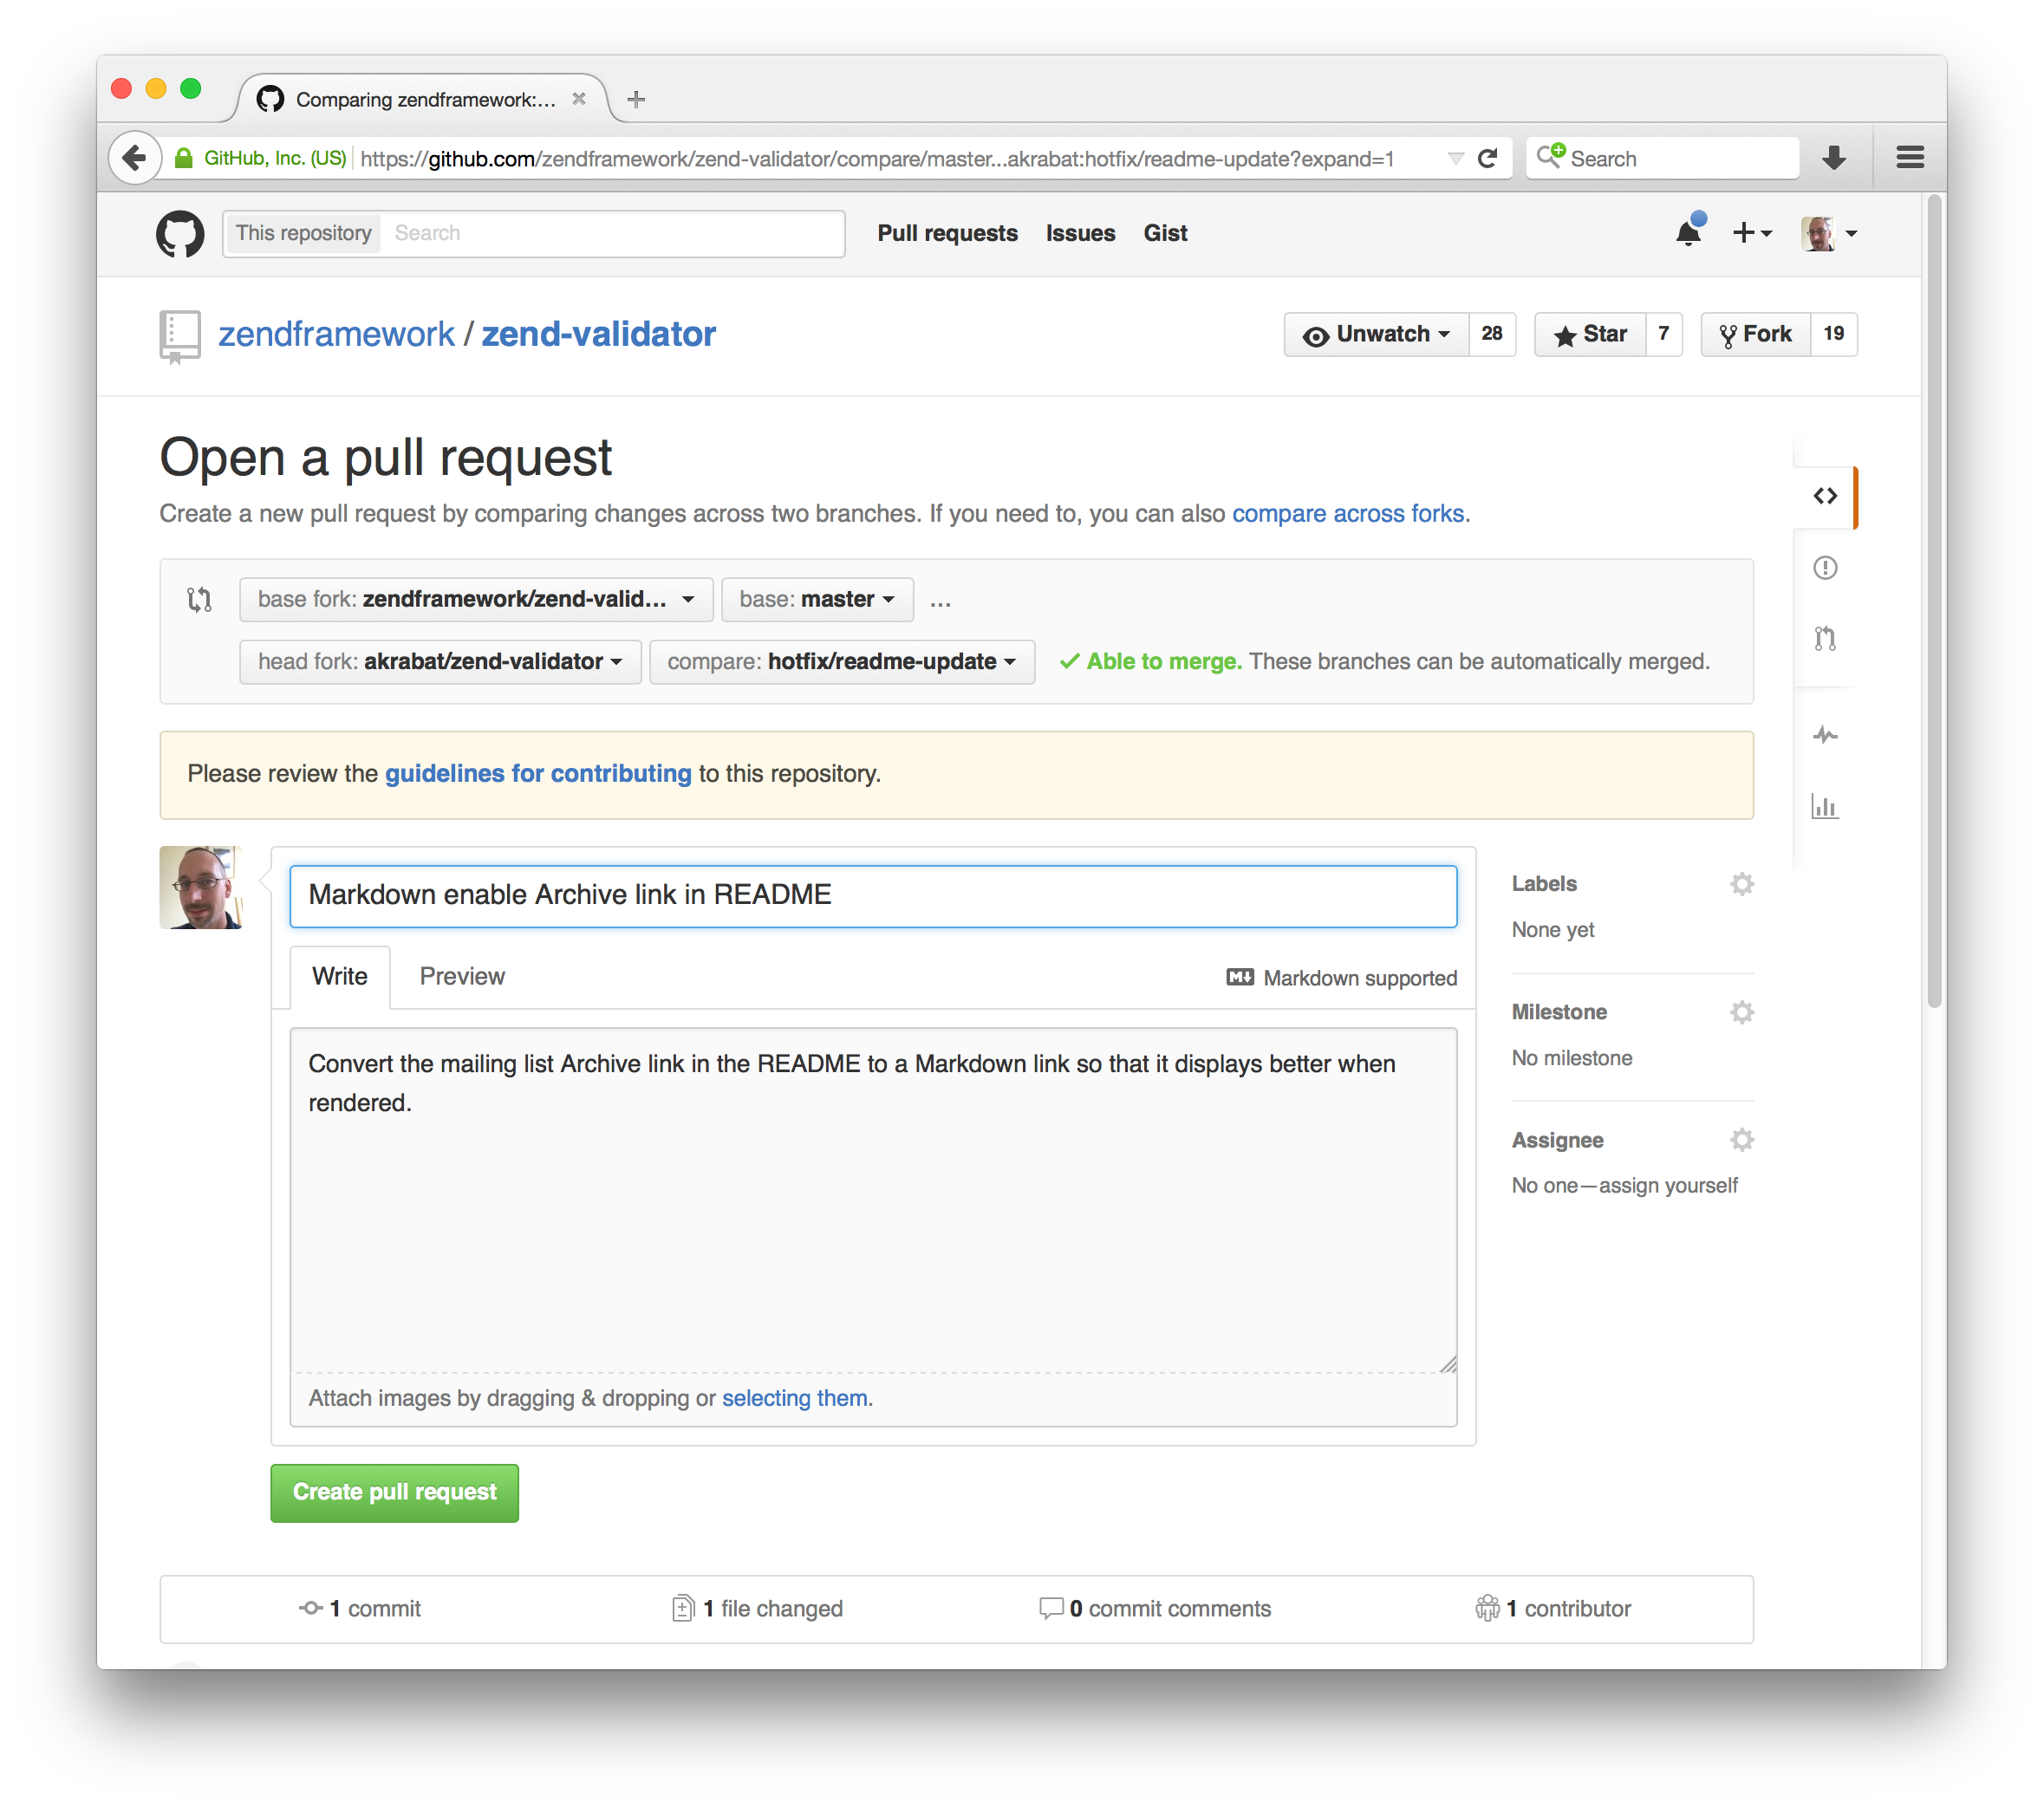
If you scroll down a bit, you’ll see a diff of your changes. Double check that it contains what you expect.
Once you are happy, press the “Create pull request” button and you’re done.
Step 5: Review by the maintainers
For your work to be integrated into the project, the maintainers will review your work and either request changes or merge it.
Lorna Mitchell’s article Code Reviews: Before You Even Run The Code covers the things that the maintainers will look for, so read it and ensure you’ve made their lives as easy as possible.
To sum up
That’s all there is to it. The fundamentals are:
- Fork the project & clone locally.
- Create an upstream remote and sync your local copy before you branch.
- Branch for each separate piece of work.
- Do the work, write good commit messages, and read the CONTRIBUTING file if there is one.
- Push to your origin repository.
- Create a new PR in GitHub.
- Respond to any code review feedback.
If you want to contribute to an open source project, the best one to pick is one that you are using yourself. The maintainers will appreciate it!


Excellent article. I have a question, how CI / CD would fit in this process? It would be before of the Review or as an activity once the review is completed?
I don't know how this work on github. Actually, I think it is not github. It is some CI platform like travis.
It can be set UP on different ways:
1) build will trigger automatically on creating pull request. Pull request can be merged only if build was success
2) build is triggered by changes on your work branch
3) any other way…
So, the answer depends for each project, I think.
WOWW, nice nice nice! Many thanks, Mr. Rob!
Thanks for this article it was very clear and easy to follow.
I've just my first Pull Request and I'm now dealing with the a Code Review.
Just a note for anyone else – Updating your pull request is as simple as making the changes and committing them, the Pull Request is automatically updated.
Thanks again
Thanks for your article, it is very clear and simple.
Best regards
This is an eye-opener
Thank you very much, the article was very helpful and well explained.
Just what I was looking for, thank you!
Very explanatory! Thanks!
really enlightening article on git…thanks a million
Great tutorial to get you started on contributing to open source. Recommend it !
Thanks Rob. If I'm submitting a PR for test coverage and badge, how do I add the author's credentials to, say coveralls to be able to generate the coverage and badge.
very well written, thank you
Amazing Article :)
Thanks. This article was useful today :)
Clear and simple.
Very helpful.
Thank you very much.
I've started on a project to help beginners get started with contributing to open source.
https://github.com/Roshanjossey/first-contributions
You don't know how much you helped me with my first contribution to my team's project. Very grateful.
Perfect guide – thanks for sharing!
Nice post. Thanks
Excellenet article, thanks!
nice article
This is awesome. I just realized now how easy it is to contribute to existing repository projects online. Thanks!
Good tutorial.
You wrote: "Swap back to the browser and navigate to your fork of the project". That is true, we also can see the same thing if we navigate to the original repository.
Thank you
BEGUERADJ Billal
Nice post. If the upstream ssh address doesn't work then could use http address.
Thanks this was mostly simple and succinct.
Ultimately valuable.
Thank you for such an awesome and simple tutorial.
Best regards.
Nice one
Great stuff, this was very instructional and useful. Thanks!
Hey Buddy, Thank You for this wonderful write up on git.
Great write up with easy to follow instructions, thanks.
Hello,
I am sorry, I feel stupid reading that it was clear for everybody here. Being a real dummy probably, I was not able to follow. When do you commit? After this, right ?
$ git checkout master
$ git pull upstream master && git push origin master
$ git checkout -b hotfix/readme-update
So why do you push?
Alex,
After you have created the new branch with git checkout -b hotfix/readme-update, you then make changes and commit them.
he first pulled the changes from original project and then pushed the changes to the forked version of the project.
Thankyou so much for the guide , i was not being able to contribute on github repos , but after this guide i made my commit and successfully contributed to the open source project.
Please make sure you have the correct access rights
and the repository exists.
When I cloned the repository this message came up
I grateful for the article, you made me understand the workflow properly. Thank a lot
This is great but all tutorials seem tps top after the PR is cpmplete – step 7 in the summary
At this point I believe you are left with both a local and origin remote brnach named "hotfix/readme-update"
So now I want to make more changes do i:
1. merge the local hotfix/readme-update with the local master and push to remote origin master
2. change to local master and create a new branch named for example hotfix/readme-update-more
3. delete older local and origin branch named hotfix/readme-update
4. use new branch hotfix/readme-update-more through to PR acceptance as you descibed above.
5. repeat steps 1 – 4 above for all new development
— this first set of steps assumes we want to get rid of branches that are completed
1. change to local master
2. pull from upstrem master in case some new changes have crept in
3. create new local branch for example hotfix/readme-update-more
4 . continue as you explained above only usethe new branch through to PR acceptance
5. repeat steps 1 – 4 above for all new development
— this second set of steps assume the old local and remote origin branchs are left as history
I think it matters to a certain degree what order these steps are done in though it may vary silighty.
Carl,
Good question! I should write a follow up for the next steps. Until then…
You don't merge your work to master as the project maintainers will do so. Also, you never re-use a branch for new work – create a new one.
Once your PR has been merged, you can delete your branch. Firstly update your master with the changes from the maintainers:
You can now delete your branch:
You now have the latest version of the code, so for your next change you can start again at step 3 with:
and away you go making the changes required.
Hopefully that makes sense!
Very very useful.Thank you man.
Greate Article, Thanks.
That is a cool article, thank you for sharing :)
A very nice step by step article. Thanks bro…
This helped. just wanted to say thanks!
Thank you very much for this Sir
Great post. Helped me a lot.
Thank you for such an awesome and simple tutorial.
Best regards.
Very nice. Blessings
Very good
Very useful article, thanks Rob.
If you, say, add a feature, in a PR and the original repo owner does not want to include it in their repo, is there a way to retain and merge this feature back into the forked repo so that I can make use of it myself?
Or in the case of a repo that is no longer maintained, is there a way I can become the maintainer of the fork, adding features and fixes as I go?
Great one. I'm learning from the experts. Thanks a lot
Thank you for providing this clear and thoughtful guide!
That is a great article
Thank you very much!!